The web is and probably always be an ever-evolving platform. Even though most of us have a decent internet connection these days, it is not the case for everyone in the world. Even if you have a nice internet, it might be flaky if you are traveling. Such situations can often lead to bad user experience for websites. This was the problem that Google was trying to tackle when they came up with the concept of Progressive Web Applications. PWAs brought in the concept of a service worker.
A progressive web app is a user experience (not just for web apps, but websites too) that is fast, reliable and engaging. These applications work cross-platform and provide an app-like experience on the web. In other words, Progressive Web Apps are somewhat network independent and work with both offline as well as poor network connections.
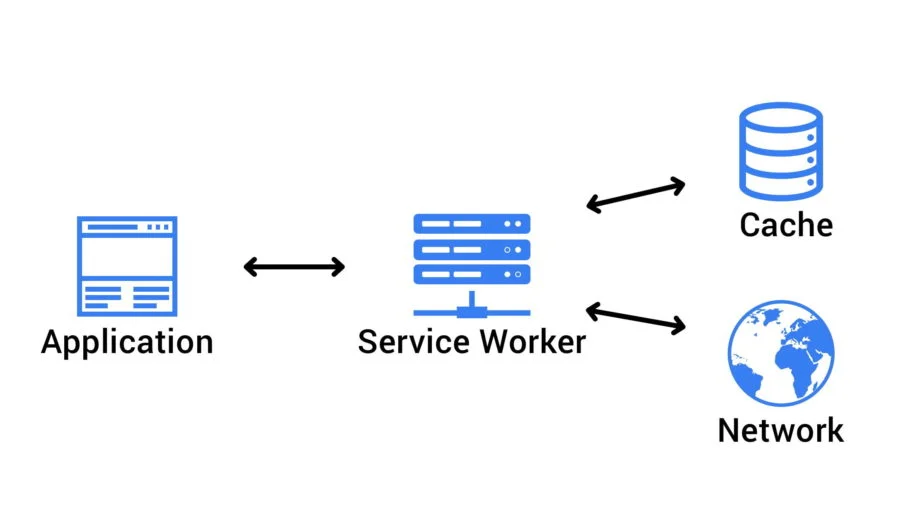
This is made possible with the help of a service worker. It is a programmable network proxy inside the browser that manages network requests.
Benefits of a service worker
The benefits of using a service worker are huge! With just a small amount of coding effort, you are able to:
- Decrease your page load time
- Implement better caching
- Give a mobile application like feel to your application providing functionalities such as
- home screen icons for mobile browsers
- sending push notifications to the user
- full-screen mode, etc.
What does it do?
Service worker sits as a proxy in between your web application and the rest of the web (including browser and the network, if available).
It intercepts network requests. It then takes appropriate action according to the network conditions and what you as a developer program them to do. So you could do work when you are offline. This work can then be saved for being posted to the server whenever the browser goes online. You could react to long-running network requests and choose a different strategy for people on slow internet connections. Or you could get creative with a different combination of mechanisms since you now have control over the network requests.
Apart from using different caching strategies for the web application, it can also be programmed to precache assets that the user might fetch next. Or it can just make use of the programmatically accessible caching API to cache items efficiently.
They can also be used to send push notifications to the user, or sync data in the background. The ability to push also allows the server to send data to the service worker, even though the web page might not be open. So you could update the content/data/cache using the worker without the user even opening the browser.
The service worker survives even if the browser tab is closed. So you can fetch things in the background or do some interesting things in the background for a few seconds if needed. (There is a ton of security around it to not allow malicious use of it though).
You can also do transparent URL rewrites using it. Let’s say you were fetching an image from a CDN and for some reason that is not accessible. You could just use a different one if needed instead of changing the HTML of the page. This technique could also be used to create a browser side load balancer if you wanted to.
You can use service workers across all latest versions of browsers today, though some progressive web app functionalities might be missing in some browser. A couple of things to keep in mind are that they work on HTTPS pages only and do not have access to DOM elements.
Creating a Service Worker
You need to register a service worker in your main JavaScript file. For doing so, in your onLoad method, you would do the following:
if ('serviceWorker' in navigator) {
  window.addEventListener('load', function() {
    navigator.serviceWorker.register('/sw.js').then(function(registration) {
      // Registration successful
      console.log('ServiceWorker registration was successful with scope: ', registration.scope);
    }, function(err) {
      // Registration failed
      console.log('ServiceWorker registration failed with error: ', err);
    });
  });
}The above code is checking if service worker property exists on the navigator object, then register the service worker that will be defined in the sw.js file (which we will create next). This tells the browser to register a service worker for the domain the file is being served from and whatever logic exists in the sw.js file is the worker for it.
A quick note that if you place the service worker under a directory while creating it, say /src/sw.js, then it will only work for the /src/ path and not the root path. So you might want to put the file at the root of the domain and not inside a folder unless you explicitly want that. If you want to put it in the src folder, then you could do a URL redirect on the server to load the correct file when the / sw.js is called and still register it as /sw.js in the main file.
This is all you need to do to register it. Next up, we will write the implementation of the service worker itself.
Before switching to the sw.js file, we should understand about when it gets executed. As soon as you register the worker, it opens the sw.js file and executes it. But the browser may choose to kill your service worker if it is not being used and it is running low on memory (happens all the time on mobile browsers). So, if a service worker is killed and the user revisits the website, then the sw.js file is executed again. Hence, Whenever writing the service worker file code, don’t assume that the globals will retain their values forever. It does not have access to local storage either (since local storage is synchronous in nature and a service worker is asynchronous by default). So you might want to use indexDB for such things.
Getting to the file, we will start listening to events to make changes. Events are the way the service worker communicates with the website since it is an asynchronous network proxy. Another thing to know is that the browser might decide to kill your service worker at any point of time and you might be in the middle of an operation. To tell the browser to wait until some task is completed, we make use of the event.waitUntil() method.
For a basic example, we will listen to the install event. We will open a cache using a unique identifier. The cache which will store all our domain related data. We need to provide it with a list of URL’s that we want to be cached.
const CACHE_NAME = 'wisdomgeek-v1';
const URLS_TO_CACHE = [
  '/styles/main.css',
  '/script/app.js'
];

self.addEventListener('install', function onInstall(event) {
  // Perform install steps
  event.waitUntil(
    caches.open(CACHE_NAME)
      .then(function(cache) {
        console.log('Opened cache');
        return cache.addAll(URLS_TO_CACHE);
      })
  );
});cache.addAll takes an array of files that the cache needs to store. This chain of promises is waited upon until all of them get resolved.
The service worker successfully installs if all the files get cached. It fails if even one of the files fails to download. After installing the worker, you would also want to use it to return the cached files instead of relying on the network. This will be done by capturing the fetch event inside the worker. Inside the callback to this event, we respond with files from the cache if they exist in it. Else we make a call to a network request using fetch for them.
self.addEventListener('fetch', function onFetch(event) {
  event.respondWith(
    caches.match(event.request)
      .then(function(response) {
        // Found in cache, return it
        if (response) {
          return response;
        }
        return fetch(event.request);
      }
    )
  );
});If we want to add the new requests that we are making to the cache as we make them, we can change the fetch callback to:
return fetch(event.request).then(function(response) {
            // Check if we received a valid response
            if (!response || response.status !== 200 || response.type !== 'basic') {
              return response;
            }
            var responseToCache = response.clone();
            caches.open(CACHE_NAME)
              .then(function(cache) {
                cache.put(event.request, responseToCache);
              });
            return response;
});We make the request and then in the callback check if it is a valid response. If it is, then we add it to the cache, else we just return it. We are cloning the response because the response is a stream and it’s body can only be consumed once.
And that is all you need to know about a basic service worker. There is a lot more to service workers than what can be covered in a single post. You can check this MDN link for more configuration samples and in-depth dive of code samples.
Do let us know in comments below if you are planning to implement service workers. Or if you want a blog post about any advanced configurations for a service worker.